New Landing Pages
Quickly create beautiful landing pages for your marketing campaigns with New Landing Pages.
Find the new Landing Page icon in the campaign builder
- Navigate to the Campaign Builder.
- From the campaign goal section on the left-hand sidebar, locate the new "Landing Page" goal and drag it out onto the campaign canvas .
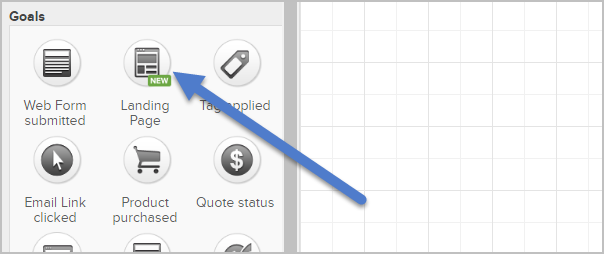
- With the new "Landing Page" on the canvas, double-click on the goal to begin configuration.


Landing Page Management
Similar to the new Email Builder, you are met with both a gallery of predesigned landing page templates and a gallery of saved/existing landing pages.
Landing Page Template Gallery
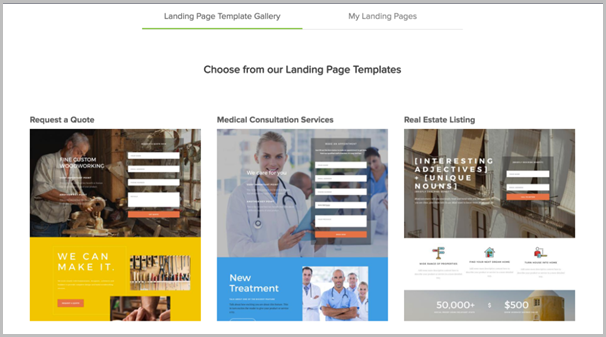
Hover over one of the predesigned landing page templates and click the Use Template button to start customizing it, or click the "eye" icon to preview the template. While previewing the template, you can click the Use Template button to start customizing it or click the X button to return to the gallery.
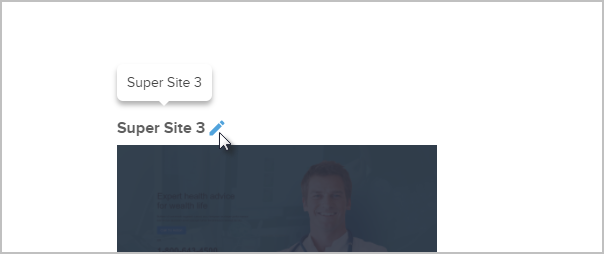
Rename an existing landing page by clicking on the pencil icon next to the name of the landing page at the top of the preview card. Once you click this pencil, you will be prompted with a text box to alter the name of your template. You may save your changes by pressing the Enter key on your keyboard. You can cancel your changes by clicking away from the text box or by pressing the Esc key on your keyboard.
My Landing Pages

Click the My Landing Pages tab to view your previously used landing pages.
Hover over a template to:
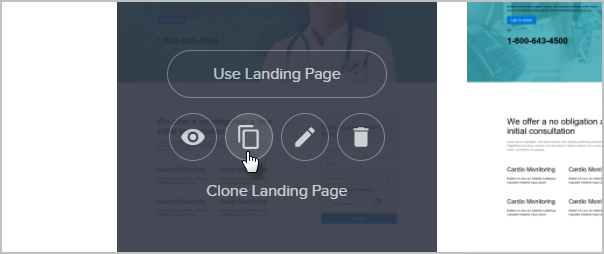
- Use Landing Page: Start using this template in your campaign
- Preview Landing Page: See a desktop and mobile preview of the landing page
- Clone Landing page: Make a copy of the landing page. Once you click this button, a clone of your landing page will appear and you will be prompted to name it.
- Edit Landing Page: Click the pencil icon to modify the landing page. Once you click the pencil icon, you will be taken to the Landing Page editor.
- Delete Landing Page: Click the trashcan icon to delete the landing page. When you click this button, you will be prompted to confirm your request to ensure landing pages aren't accidentally deleted. Once you click the red Delete button, the landing page will be permanently deleted. If you decide to keep the page, click the Cancel button which will return you to the main hover state.
Please Note! Only one unique landing page may be connected to one sequence at a time. If you want to use the same landing page with the same automation for another campaign or another sequence within the same campaign, you will need to make a copy of it for each individual use case.
Infusionsoft WordPress Plugin
Create opt-in forms right from within WordPress to simplify the process of designing, placing, and triggering forms across multiple ways and pages on your WordPress website.
WordPress Plugin Setup
- Sign in to your WordPress admin account
- Within WordPress admin view, navigate to the Plugins tab on the sidebar
- Click the Add New tab under the Plugins tab
- Search for Infusionsoft Official Opt-In Forms from the search bar found on the top right corner of the WordPress plugin directory view
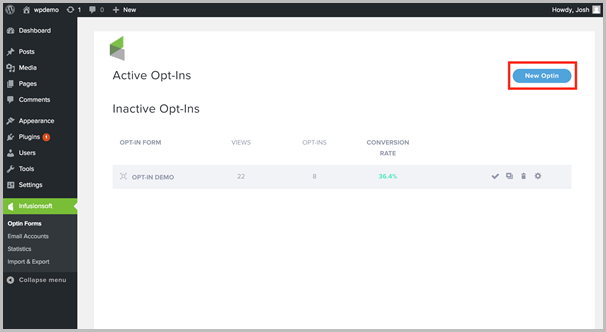
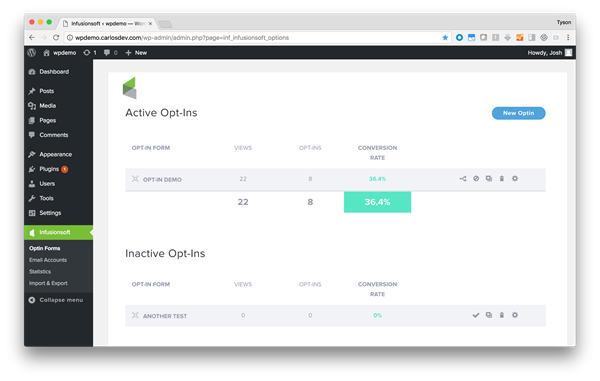
Sidebar Tab: Opt-in Forms

In this sidebar tab, you can:
- View all existing opt-in forms (active and inactive)
- View high-level statistics for all existing forms
- Create new opt-in forms
- A/B test two existing opt-in forms
- Deactivate existing forms
- Duplicate existing forms
- Delete existing forms
- Make changes to existing forms
Creating a New Form
- Click on the New Opt-In button on the top right corner of the page from the "Opt-In Forms" sidebar tab
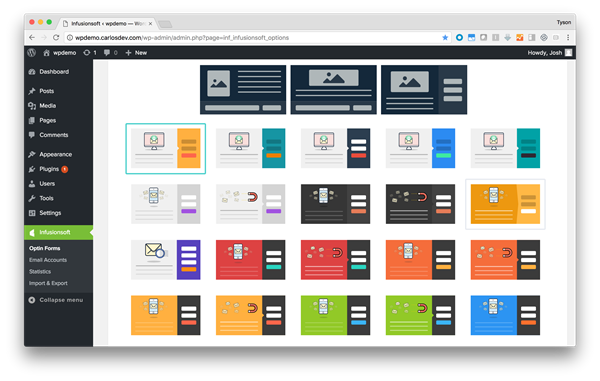
- Choose what type of opt-in form you would like to use
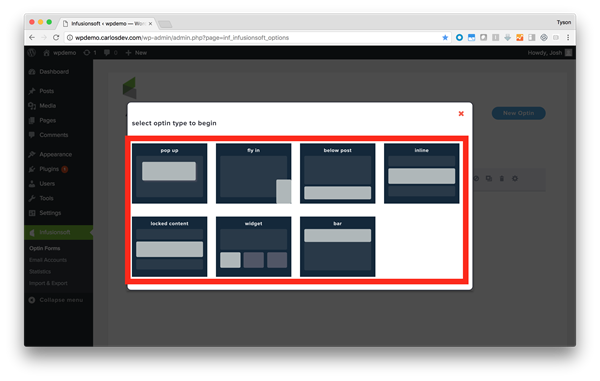
- Pop Up Opt-In Form: Prompt your visitors to opt in without annoying them. You can set Infusionsoft's Opt-In Forms to appear automatically after a specific amount of time, after visitors reach a particular point on your page, or even after visitors leave a comment or make a purchase.
- Fly In Opt-In Form: The slide-in form is the pop-up’s smooth, subtle cousin. It slides in at the bottom of your visitor’s screen and can be set to appear after a specific time or at a specific point on the page.
- Widget Opt-In Form: Use widget forms to create attractive opt-in forms for your sidebar, footer, or any other widget-friendly areas on your site.
- Locked Content Opt-In Form: Offering valuable content in exchange for an email address is one of the most effective ways to grow your email list. Protected content forms allow you to offer content your visitors can “unlock” by opting in.
- Below Post Opt-In Form: You can use “Below Content” forms to place an opt-in opportunity at the end of your blog posts or pages. Visitors who have read an entire post are highly engaged, so this is an effective way to turn that engagement into a conversion.
- Inline Opt-In Form: Want to insert an opt-in form in the middle of a blog post, rather than the end? Inline forms make it easy. You can display these forms virtually anywhere you’d like on any post or page on your website.
- Notification/Opt-In Bar: Increase your opt-ins, announce your promotions and drive traffic to the pages of your choice with our attention grabbing top-of-page banner.
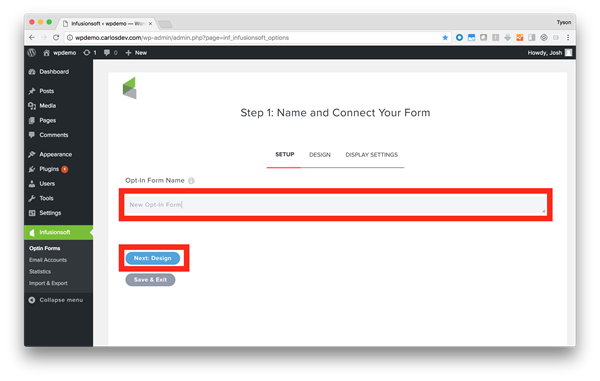
- Enter a name for your opt-in form then click the Next: Design button to advance to styling your opt-in form or click the Save & Exit button to save the opt-in and return later to edit its design & display settings.
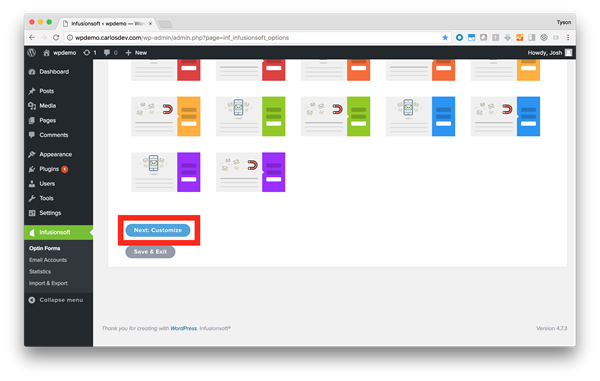
- Choose one of the three form layouts then click the blue Next: Customize button at the bottom.
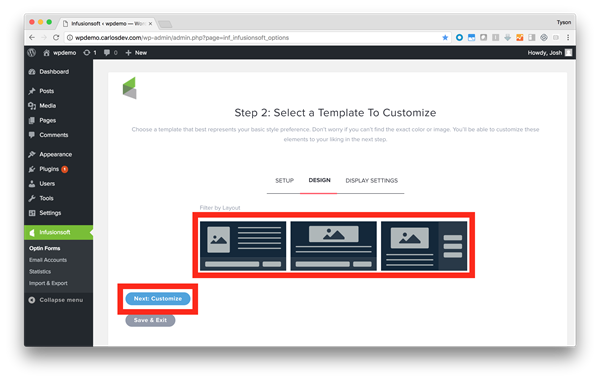
- Choose one of any pre-designed templates based on preferred color and style. You can alter these colors after a template has been selected. Once you select a template, you will automatically be taken to the bottom of the screen to click the blue Next: Customize button again to advance to the next part of customization.
- This next part of the design process allows you to access the next layer of customization. You may customize the following on your opt-in form:
- Copy
- Opt-in form header
- Opt-in form body/message
- Image
- Orientation of the image on the opt-in form
- Upload a personalized image on the opt-in form
- Animation of the image load on the opt-in form
- Ability to hide the image on mobile
- Styling
- Background color
- Copy font
- Copy color
- Corner styles
- Border orientation
- Border color
- Border styles
- Field setup
- Form orientation
- Form fields to include (no name, single name, first & last name)
- Email placeholder text
- Button text
- Opt-in consent checkbox
- Field styling
- Field orientation
- Field corner style
- Form text color
- Form background color
- Form button color
- Form button text color
- Form edge style
- Footer copy
- Successful submission copy
- URL redirect upon successful form submission
- Customize CSS
- After customizing the above settings, you can click the blue Next: Display button to customize the following elements of the opt-in form:
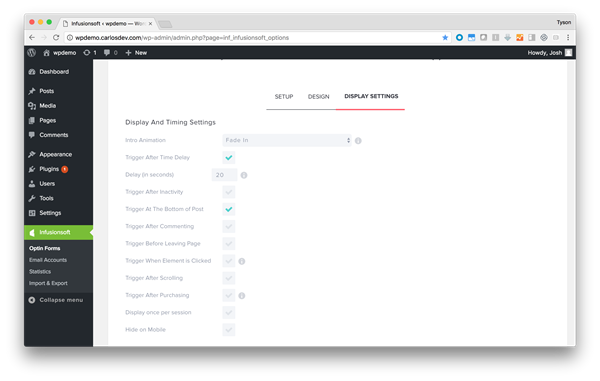
- Display and Timer Settings
- Intro animation
- Trigger after time delay and how long
- Trigger after page inactivity
- Trigger when users arrive to bottom of a post
- Trigger upon site visitor submission of a comment
- Trigger prior to a visitor leaving a page
- Trigger when a page element is clicked (Adds new onclick shortcode option to Infusionsoft editor when editing a page / post)
- Trigger after scrolling a page
- Trigger after purchasing an item from a WooCommerce page (Display on "Thank you" page of WooCommerce after purchase)
- Limit to one trigger/display per session
- Ability to hide when viewed on mobile device
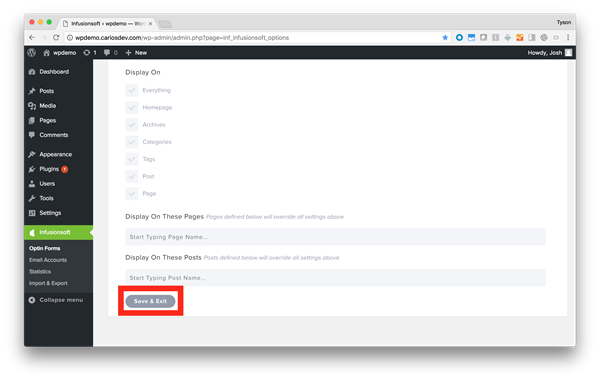
- Where to display the opt-in form. Note that the fields below these checkboxes are dynamic according to display options chosen.
- Everywhere on site
- The home page
- Archives page
- Certain page or post categories
- With specified shortcode tags
- Specified pages
- Specified posts
- Display and Timer Settings
- Once you have customized the above settings, you have completed the form setup process! To finalize, you must click the gray, Save & Exit button at the bottom of the Display Settings tab.
- After successfully configuring/customizing your opt-in form, you will be taken back to the Opt-In Forms tab and your newly created opt-in form will display in the list of opt-in forms. This list can be delineated should you make some opt-in forms inactive (see below).


Sidebar Tab : Email Accounts

In this sidebar tab, you can:
- Initialize a connection to their Infusionsoft account (on first visit)
- View the status of the connection to their Infusionsoft account
- Deactivate the existing connection to their Infusionsoft account
To connect to an Infusionsoft account:
- Navigate to where your API key is located inside of your Infusionsoft application. To generate an API key, follow these instructions.
- Copy your 32-digit encrypted API key.
- Paste this key value into the "API Key" field within the WordPress plugin.
- Enter your Infusionsoft application name. For example, if your Infusionsoft application URL is abc123.infusionsoft.com, then abc123 is your application name.
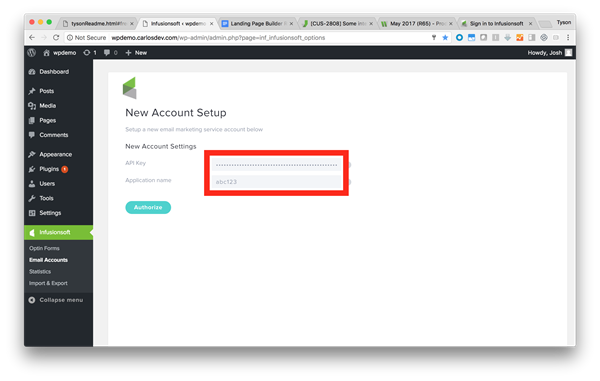
- Click the Authorize button.
- Click the Save & Exit button.

Sidebar Tab : Statistics


In this sidebar tab, you can:
- View aggregate statistics for all opt-in forms over last 30 days and last 12 months
- Manually refresh the stats data
- Clear out all stats data
- View form views, opt-ins, and conversion by each existing opt-in form
- View conversion statistics by form within any given page of the users WordPress site–ideal for optimizing placement of opt-in forms by highest converting page
Sidebar Tab : Import & Export

In this sidebar tab, you can:
- Export an existing opt-in form to share with another user
- Import an existing opt-in form received from another user
Infusionsoft Setup
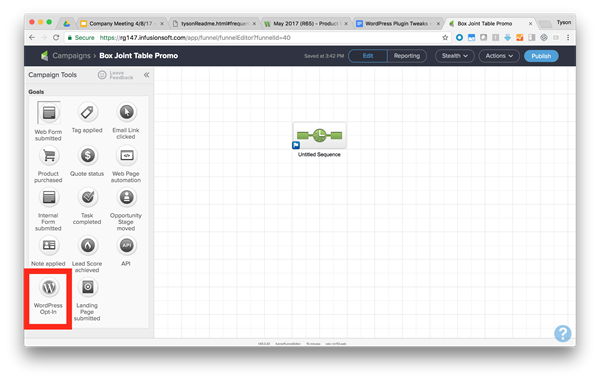
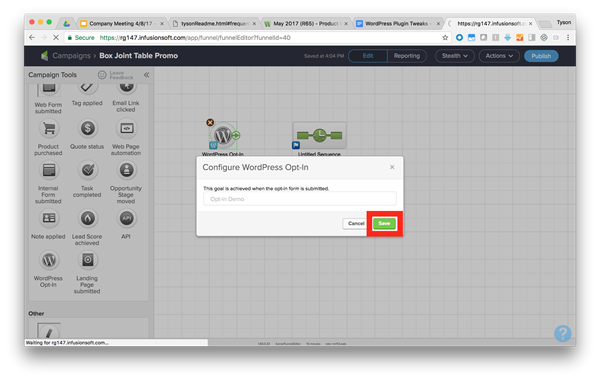
- Navigate to campaign builder
- From the campaign goal section on the left-hand sidebar, locate the "WordPress Goal" goal and drag it out onto the campaign canvas.
- With the "WordPress Goal" on the canvas, double click on the goal to designate which Infusionsoft WordPress opt-in form completes this campaign goal. Select the name of the opt-in form from the dropdown list. If you have a long list of opt-ins, begin typing the name of the desired form and you will be taken to the form in the list.
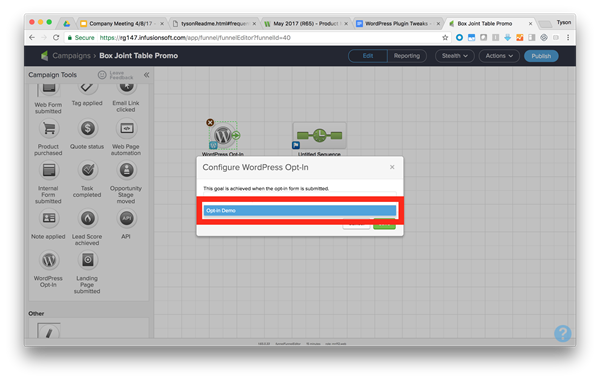
- Once the desired opt-in form is selected, you can finalize this configuration by clicking the green Save button.
- The last step to finalize the WordPress goal completion setup is to ensure that the goal is connected to a sequence and the subsequent sequence is properly configured to initiate automation for contacts completing the WordPress campaign goal.


