\
A fulfillment list can either be delivered to a user's dashboard or sent to their email address. A fulfillment list is a spreadsheet containing contact information and can include an attachment. Sending to an email address is useful if you use a third-party fulfillment company. You can also queue jobs to only send when X amount are ready to be fulfilled.
Fulfillment List vs Fulfillment Reports
A typical use-case for a fulfillment list is when you want to gather physical address information onto a spreadsheet so that you can mail-merge their information it into a word doc to print labels and/or print other personalized documents to send to them. For example, you may offer to send a prospect a free, physical brochure after they sign up for your newsletter.
The important distinction is that a fulfillment list is not associated with a product purchase.
A fulfillment report is not set up as part of a campaign sequence; it is directly tied to a purchase and an order being created in Max Classic. A fulfillment report does approximately the same thing as a fulfillment list, but the report also contains order information, such as the name of the product purchased and the quantity. Fulfillment reports are typically sent to a third-party fulfillment company that drop-ships a physical product to your customer.
- Double-click on the campaign sequence you wish to edit or create a new campaign sequence.
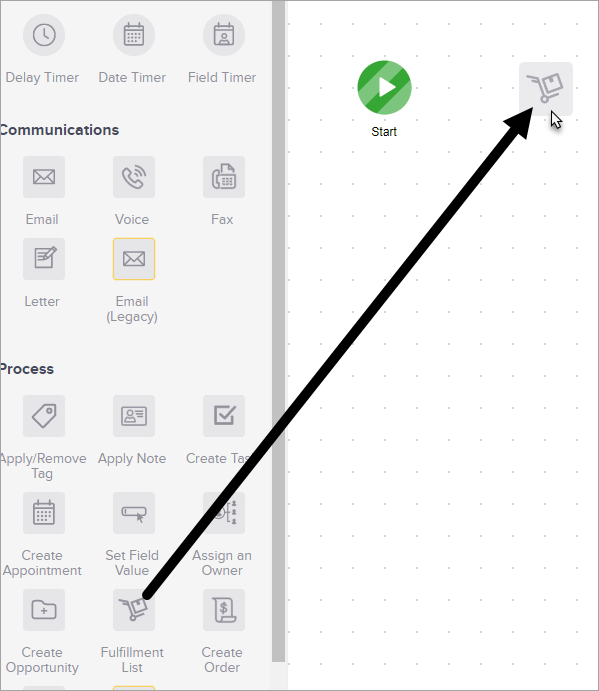
- Drag and drop a Fulfillment List object onto the canvas.
- Double-click the Fulfillment List icon to configure it.

- Delivery: There are two ways to deliver a fulfillment list: A user's dashboard and an email address.

- A User's dashboard: When you choose to send the fulfillment to a User's dashboard, you will see a couple of configurable Dashboard Options. This delivery option will send the fulfillment list to a user's dashboard. This delivery option is typically designed for companies that do their own fulfillment, or want to check over the spreadsheet before sending it to external fulfillment. The user will see the fulfillment job on their dashboard, click to open it, and then mark the fulfillment as complete when they are done.
- Assign To - Choose the Max Classic User that will be responsible for fulfilling. The user will receive a job on his or her dashboard when something is ready to be fulfilled.
- Instructions - Add a text blurb that will appear on the job description in the user's dashboard.
(Optional, but recommended) Send an email notification - This will send an email notification to the user when there is something ready to be fulfilled. The user will then look at their Max Classic dashboard to process the fulfillment job.
- An Email Address: When you choose to send the fulfillment to an email address, the fulfillment is automatically attached to the email (.csv file type) and then sent to the recipient. This delivery option will send an email with the fulfillment list attached. If you use an external fulfillment company, this will allow you to automate your fulfillment process.
- From: Choose from whom the email will be sent from
- To: Choose to whom the email will be sent. You will most likely be choosing the Other option if you are sending the email directly to an external fulfillment company. You could also send the email to yourself or another user to check over before forwarding to the fulfillment house.
- Subject: This is the subject line of the email. It is best-practice to include your company's name or initials and a short job description (e.g. RDFP Mailing Job: New Customer Welcome Gift.)
- Body: Add any instructions that the fulfillment company will need in the body of the email.
- A User's dashboard: When you choose to send the fulfillment to a User's dashboard, you will see a couple of configurable Dashboard Options. This delivery option will send the fulfillment list to a user's dashboard. This delivery option is typically designed for companies that do their own fulfillment, or want to check over the spreadsheet before sending it to external fulfillment. The user will see the fulfillment job on their dashboard, click to open it, and then mark the fulfillment as complete when they are done.
- Fields: In this section, you will choose which contact record fields you want to add to the fulfillment list. The left-hand column titled, Keap Fields, represents all the available fields you can choose from. The right-hand column represents the fields that will actually be present on the spreadsheet the recipient receives. To add or remove fields, just click the + or - next to a field on the right-hand side.

- Attachments: Attachments are optional. Select or upload any additional documents needed to process the mailing. Click the "+" button to add multiple documents.

- Test & Publish. When you are finished configuring your fulfillment list, click the Send Test button and select a user from the drop-down.
- When finished, change the status from Draft to Publish, click back to your sequence
- You can now publish your changes.

