You can use the Max Classic Modify Existing Records Import tool to mass update a specific list of contacts. This mass update option allows you to update a group of existing contacts. For example, you may need to add country information to all of your existing contacts. You can export a list, add each person's country information to it, and then import it back into Max Classic to update your existing contact list. The Contact ID field must be included in the export and the updated import file.
Warning! The new information will permanently overwrite existing information in the updated field(s). The only exception is the Contact Notes field; this field can only be appended to. Updates performed through the Import tool cannot be reversed. Make sure you preview the field matching before you complete the import.
Part 1 - Find a List of Contacts
- Go to CRM > Contacts in the main navigation menu.

- Select a saved search from the drop-down or click on Start Over to enter new search criteria and then click the Search button.
- Verify you have the correct list.

Part 2 - Export the List
- Click on the Actions button and select Export

- Choose the fields to export. All of the fields are selected by default. Click on the top check box to clear the selections. Mark the boxes next to the fields you want to include in the export. You MUST include the Id field.

- Save the file to your computer.


Part 3 - Add or Change Data
- Open the csv file to change or add fields. You can add fields by inserting a new column on the spreadsheet. Make sure you add a descriptive header to the top of the column.
- Remove unnecessary columns from the spreadsheet. Only import the Keap ID column and columns that contain updated information.
- Save the revised file.
Part 4 - Import The Updated List
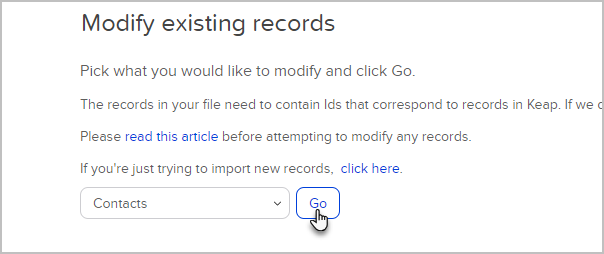
- Go to Reporting > Data Cleanup in the main navigation menu

- Click on Modify Existing Records. Select the data type and click on Go

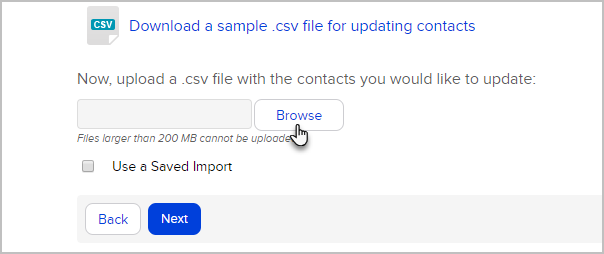
- Click on Browse to find the revised csv file on your computer, and then click Next
- Match the Fields. The ID Field must match with the Keap ID Field
- Follow the import wizard instructions to complete the process


