With Keap you can import contacts, companies, tags, products, and subscriptions. The most common import is contacts. The process for each type of import is almost identical.
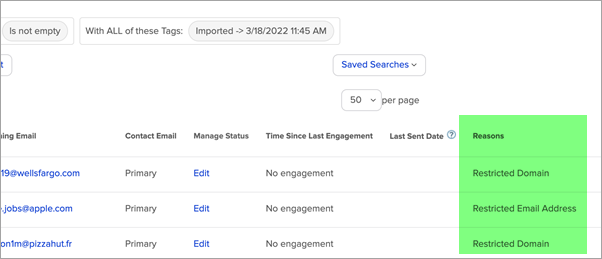
During the import, Keap will automatically scan emails for non-marketable domains, known invalid email addresses, disposable addresses and delinquent (not used for >12 months) email addresses. If problem email addresses are found, you will be notified and given the opportunity to review those email addresses.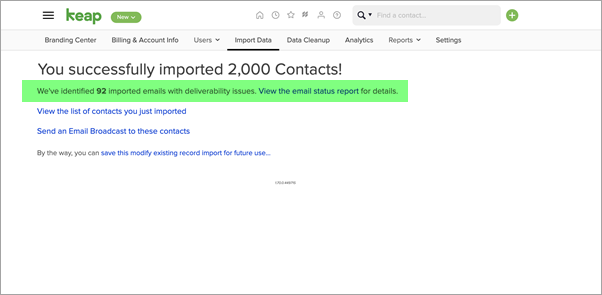
Import contacts
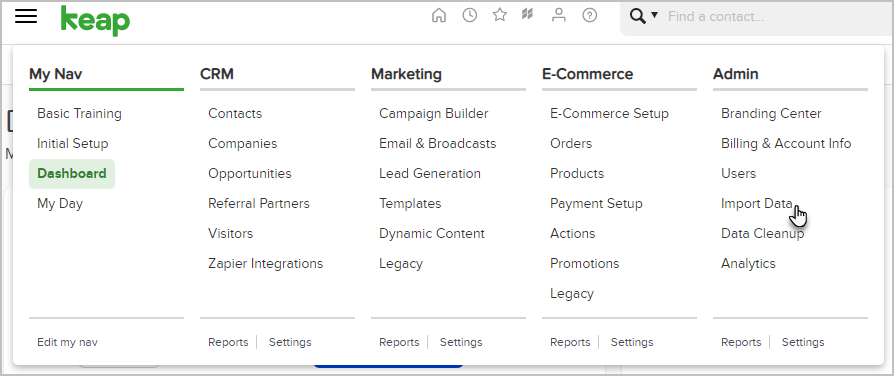
- Navigate to Admin > Import Data.

- Select a source and Contacts, then click Go

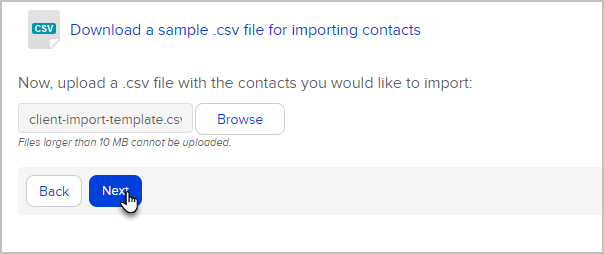
- Click on Browse to select a csv file from your computer.
Note: Files larger than 10 MB cannot be uploaded. In a situation where you have a file larger than 10 MB, you would need to split it into multiple files. You can use free software like Free Huge CSV Splitter to help you.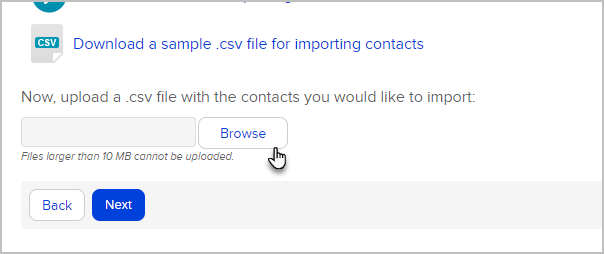 Note: If you previously imported a similar file and chose to "Save the Import", you can choose this option and it will load the same field matching rules so you don't have to match the fields a second time. This can save you a lot of time if you are frequently importing CSV files from another system. A "Saved Import" is just a saved set of matching rules from a previous import.
 - Click on Next to start the import wizard.
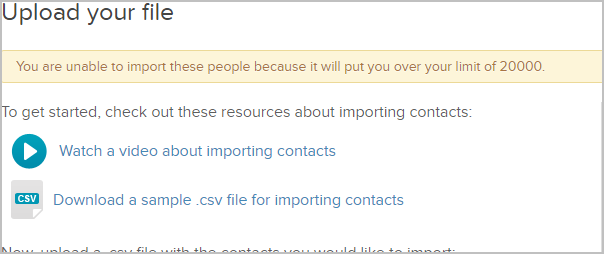
- Note that if your file contains too many contacts and you go over your contact limit, you will see the message below. At this time, you can either purchase an additional contact package, or purge old contacts from your database - for example, you could remove all contacts that have opted-out of your marketing to make room for more contacts.
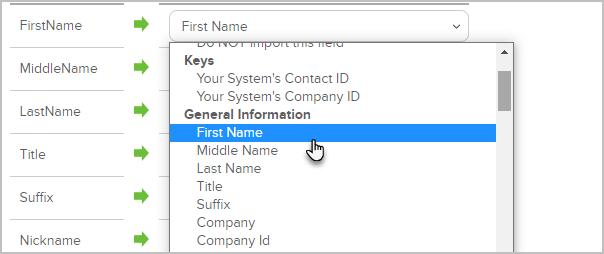
- Match the fields. The field name from your spreadsheet is on the left column. The Keap field name is on the right. Select the matching field from each drop-down. If a matching field is not listed, you can create a custom field or select Do not Import this field to omit the field from the import.
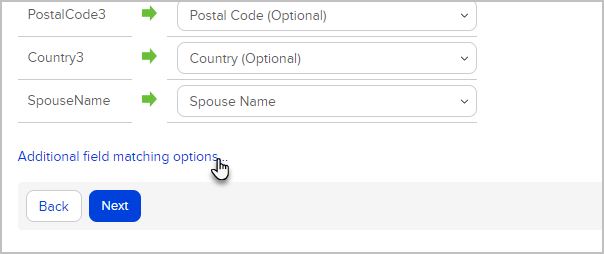
(Optional) Match field values for the multi-choice fields (e.g. drop-downs or select lists). Select a matching field from each drop down. If you need to populate multiple fields with data from one spreadsheet, click on the Additional Field Matching Options link at the bottom of the page.
- Click Next when you have finished mapping your fields.

- Confirm Explicit Permission to send email. Read through the permission guidelines and choose Yes or No.

No - These contacts will be imported with the email status of Non-Marketable which means you will still be able to send them individual emails. You will not however be able to use these contacts in Email Broadcasts or Campaigns. Read more on Email Status
Yes - When you select Yes, you are agreeing to the Keap Acceptable Use Policy and are required to answer a series of questions regarding how you obtained the list you are importing. This information will be reviewed by our compliance team.
- Click Next after you have successfully answered the questions. If some information is missing or incomplete, you will be alerted to provide more information.

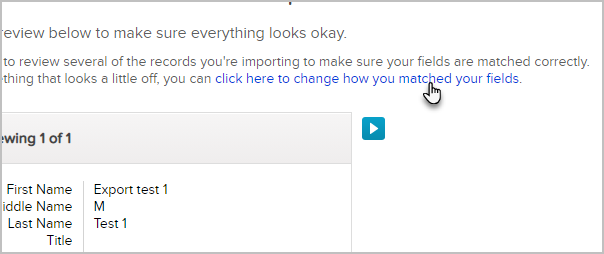
- Review your import. Click on Previous or Next to scroll through a few of the records to verify you matched the fields properly.

- (Optional) If you make a mistake, click the link to make changes to the field mapping before proceeding.
Pro Tip! You can mark the checkbox to create or add contacts to an existing company record that has a company name in the company field. If the Company record doesn't exist, it will be created. Every contact that belongs to the same company will be grouped together in the same company record. Please Note that any spelling variation in a company name will create multiple company records. For example, "Keap" and "Keap Software" would create two separate companies.

- Click Done to begin the import.

- (Optional) Upon completing the import, you have the option to view the imported list, send a broadcast, or save the import settings. When you save the import settings, the system stores the field matches and the actions that you assigned to the import (see #9). Using a saved import allows you to skip some import steps when you import the same kind of list in the future.

 Note: If you previously imported a similar file and chose to "Save the Import", you can choose this option and it will load the same field matching rules so you don't have to match the fields a second time. This can save you a lot of time if you are frequently importing CSV files from another system. A "Saved Import" is just a saved set of matching rules from a previous import.


Contact import FAQs
Does the Contact Import run a Duplicate check?
No Duplicate check is run. If duplicates exist in the import file or in the application follow the instructions in Identify Duplicate Contact Records.
What data should I import?
Take the time to be thorough. Have an in-depth understanding of exactly what data you currently have. Typically, you only want to bring actionable data over from a previous system. Any data that is not actionable now or in the foreseeable future should be scrutinized. If the data does not provide value to your organization, don't import it. The more data you bring over, the more complex the migration will become.
Note: Importing contacts will not change the email status of previously opted-out contacts. Meaning, if my customer Tom unsubscribed and his email was imported again, it would remain opted-out.
How do I clean up my source data?
Make sure to prepare your data for the migration. Follow this guide to avoid common mistakes. If you have data spread across multiple spreadsheets, you will likely need to use functions like Microsoft Excel's VLOOKUP and/or Text To Columns to format your data accurately in excel. If these functions seem overwhelming, it may be a good time to turn this over to experts.
What is CSV - comma delimited format?
CSV formatting enables a smooth transition of data between systems. Before you import, make sure that your data is in csv (comma delimited) file format and that it has been properly prepared. Click on the links below to view sample .csv files:
How do I import UTF-8 characters?
Imports with UTF-8 characters will fail if the file was created or edited using Microsoft Excel. Instead, convert your excel spreadsheet to a Google Sheet:
- Open your Excel file, select all data and copy (Ctrl-C).
- Open Google Sheets and paste your data into a new sheet (Ctrl-V).
- Save your Google Sheet as a CSV file (top left corner in Sheets: File > Download As > Comma-separated values (.csv , current sheet). Remember, do not open the newly saved CSV file in Excel at any time after this step.
- Navigate to Keap and import the CSV file you just saved from Google Sheets using the import tool.
How do I build the structure in Keap? (Tags vs. Custom Fields)
When deciding on what method to use to segment data, first ask yourself how you plan on searching for the data and what type of reports would you like to create?
- Tags are labels that you can apply to contact records in Keap.
- Tags are visible when looking at the contact record.
- Tags are used as filters in search queries.
- Many different types of reports allow you to filter by tag.
- Tags are the most commonly used way to segment data in Keap. For example, you could search for everyone in your database that has tag x, but does not have Tags y and z.
- Custom fields allow a ton of flexibility.
- You can create many different types of custom fields and merge custom field data into emails to personalize them.
- If you want to store data in custom fields, take a look at all of the available field types and decide which field type a particular piece of data should use.
- The best way to determine what type of field to use is to think about how you want to search for that data when you build a report. For example, if you are importing a date, you wouldn't want to import dates into text fields or as individual tags; you would want to import them into date fields so you can perform searches based on date ranges.
- You can add up to 150 custom fields in Keap Max Classic.
- It's fine to build custom fields and import some sample data to see if it meets your needs. You can always delete custom fields and rollback imports.
- Take the time to test things out to find the optimal way to store your data.
How do I quality check my data?
Search through your data and evaluate the results. If you've made a mistake, or just aren't happy with the results, you can always rollback your imports and rebuild your custom fields and tags. Taking the time to do this right will give you the power to effectively and efficiently slice and dice your data when that time comes.