
Why Re-Engagement Campaigns Protect Your Email Deliverability
As your contact list grows, some contacts will stop opening or clicking your emails over time. Sending emails to unengaged contacts hurts your sender reputation and reduces the chances that your emails reach the inbox of contacts who do want to hear from you. By tagging unengaged contacts and sending them a targeted re-engagement campaign, you give those contacts a chance to opt back in — and you keep your list healthy so your emails continue to land where they should.
This article covers how to search for contacts who have not engaged with your emails in the past 30 days and apply a tag to that group so you can target them with a re-engagement campaign. This article does not cover building or sending the re-engagement email sequence. To continue to the next step after tagging your contacts, see how to send re-engagement emails to unengaged contacts using automated list management.
How to Tag Unengaged Contacts for a Re-Engagement Campaign
Before you begin, log in to your CRM. The steps below walk you through searching for unengaged contacts using the Email Status Search report and applying a tag to the results so you can target them in a campaign.
Step 1: Open the Email Status Search Report
The location of the Email Status Search report depends on which version of the CRM you are using.
- If you are on the Pro or Max plan: Click Reports in the main navigation. Then click Email Status Search.
- If you are on the Classic plan: Click Marketing in the main navigation. Then click Reports, and then click Email Status Search.
Step 2: Select the Email Status Filter
In the Email Status Search report, locate the Email Status drop-down. Select the following four options: Unengaged Marketable, Unconfirmed, Confirmed (Legacy), and Confirmed. Selecting all four options ensures the search returns every contact who is eligible to receive marketing emails, regardless of how their email status was set.
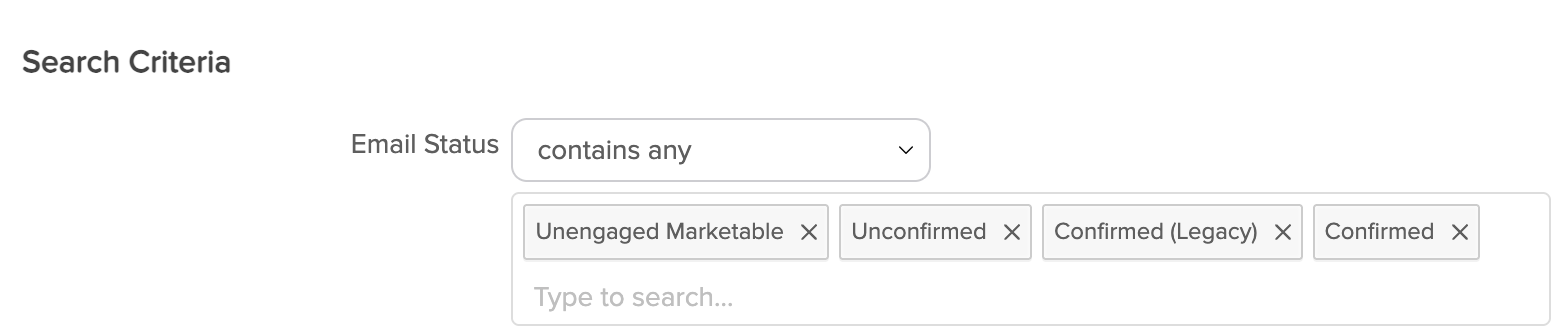
The Email Status drop-down displays four checkboxes: Unengaged Marketable, Unconfirmed, Confirmed (Legacy), and Confirmed. All four must be checked before running the search.
Step 3: Set the Last Engagement Date Filter
Locate the Last Engagement Date drop-down and select More than 30 days. This filters the results to show only contacts whose last recorded interaction with one of your emails — such as an open or a click — occurred more than 30 days ago.
Step 4: Set the Last Engagement Interval
Locate the Last Engagement Interval date range fields. In the first date field, enter the date that is exactly 30 days before today's date. In the second date field, enter today's date. This date range tells the search to look for contacts whose last engagement falls within the 30-day window ending today.

The Last Engagement Interval section displays two date input fields side by side. The first field is set to 30 days before today and the second field is set to today's date.
Step 5: Exclude Recently Created Contacts
Click the Misc Criteria tab to open the additional filter options. Locate the Date Created field. In the first date field, enter January 1, 2000. In the second date field, enter the date that is exactly 4 months before today's date. This configuration excludes contacts who were added to your CRM within the last 4 months, since newly created contacts have not had enough time to engage and should not be flagged as unengaged.

The Misc Criteria tab displays the Date Created filter with two date fields. The first date field is set to 01/01/2000 and the second is set to 4 months before today's date.
Step 6: Run the Search
Click the Search button at the bottom of the Email Status Search page to run the search. The page will display a list of contacts who match all the filters you configured in Steps 2 through 5.
Step 7: Select All Results and Apply a Tag
At the top of the search results list, click the Select All checkbox to select every contact in the results.
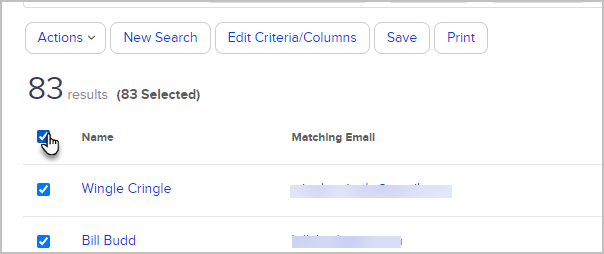
The search results page displays a list of contacts with a Select All checkbox at the top left of the list. When selected, every contact in the results list shows a checkmark.
Click the Actions drop-down above the results list and select Apply/Remove Tag.

The Actions drop-down displays several options including Apply/Remove Tag. Click Apply/Remove Tag to open the tag selection dialog.
Step 8: Apply or Create a Tag
In the tag dialog, make sure the Apply radio button is selected. Then either select an existing tag from the list or click Create a new Tag to create one.
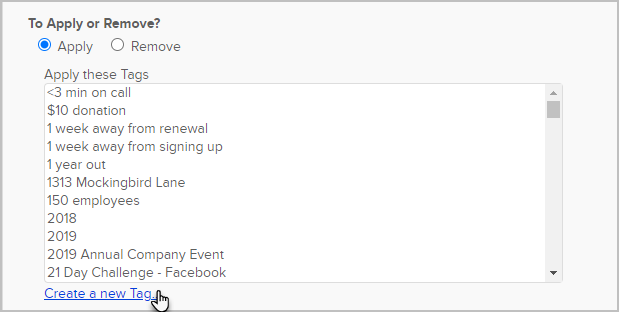
The Apply/Remove Tag dialog displays the Apply radio button selected at the top, followed by a list of existing tags and a Create a new Tag option below the list.
To create a new tag, enter a name in the Tag Name field and click Create this Tag.
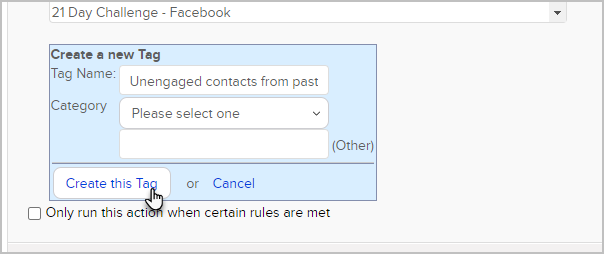
The Create a new Tag section displays a single text field labeled Tag Name and a Create this Tag button directly below it.
Once you have selected or created your tag, click Save and then click Process Action. The tag will be applied to every contact in your search results.
Next Step: Send Your Re-Engagement Campaign
Now that your unengaged contacts are tagged, you are ready to build and send the re-engagement email sequence. See how to send re-engagement emails to unengaged contacts using automated list management to continue.
Need Additional Help with Email Deliverability?
If you would like professional guidance on email practices or tools to improve your email deliverability, the following trusted partners offer specialized services.
Email Deliverability Training, Consulting, and Software
List Cleaning
- SpamClean — email list cleaning service
- ListDefender — email list cleaning and form security
- Klean13 — email list cleaning service
- EmailSmart Pro Tools — email list cleaning and deliverability tools
Form Security
Comments
0 comments
Please sign in to leave a comment.